-2.png?width=221&height=60&name=Navigo_Logo_High_Res%20(1)-2.png)
What this tool does
The Access Protection Configurator lets you control exactly what different groups of people can see when they use org.manager. Rather than giving everyone the same view of your organisation, you can set up separate roles and decide what each role can and can't access, right down to individual fields like salary or personal details, or down to which parts of the organisation they can see.
Navigo provides you with a link to the tool and has already done some of the setup (steps 1 and 2), based on your org.manager configuration before sending you this link, so you're picking up partway through.
There are three things you'll do: define your access roles, configure what each role can see, and then review and submit your setup.
Finding your way around
The toolbar at the top of the screen shows your progress and which step you're currently on, so you can always see how far through the setup you are.

If you need to come back to this article while you're working, click the question mark icon in the top right corner, and it will bring you straight here.
You'll also notice small i icons next to some fields and buttons throughout the tool. Hover over one with your mouse and it will show you a short explanation of what that field or button does.
Once you're in the Configure step, you'll also see a Sections list down the left-hand side for whichever role you're working on. As you complete each section it's marked here, so you can see at a glance what's left to do for that role.
Steps 1 and 2: Done by Navigo
Before sending the link to the tool to you, Navigo has already completed these steps. Your link will open directly at Step 3.
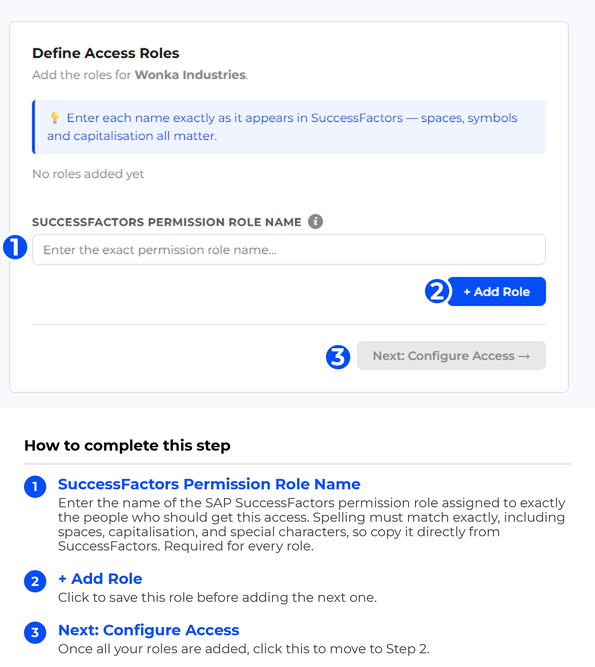
Step 3: Define access roles
Here, you create a role for each group of users who need a different view of your organisation.
In the SuccessFactors Permission Role Name field, enter the name of the SAP SuccessFactors permission role that's assigned to exactly the group of people who should get this access. This is how we know which permission role the access you configure in the next step applies to.
Spelling needs to match exactly, including spaces, capital versus lower-case letters, and any special characters, so it's worth copying the name directly from SuccessFactors rather than typing it from memory.
Click + Add Role to save each role before moving to the next. Once you've added all your roles, move on to configure access.
Step 4: Configure access
This is where you decide what each role can actually see and do in org.manager.
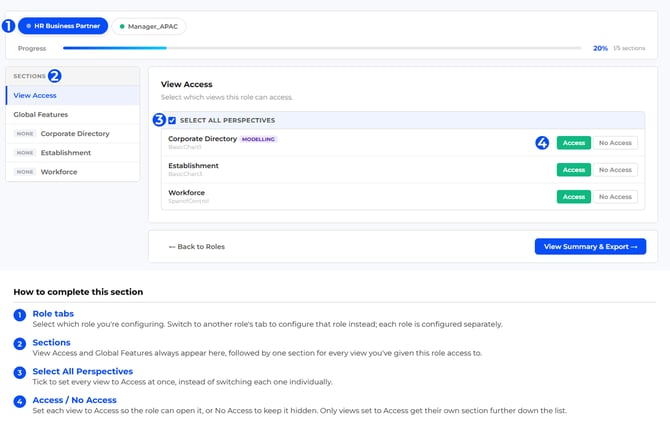
You'll configure access separately for every role you created in Step 1: use the role tabs near the top of the screen to switch between them. For each role, you'll work through the sections listed on the left: View Access and Global Features always appear, followed by one additional section for every view you've given that role access to.
View Access
This section controls which views the role can open at all (for example, an org chart, a workforce simulation view, or a remuneration view). The exact views available depend on your organisation's setup.
For each view, set the switch to Access or No Access. A role only sees a view in org.manager if it's set to Access, and only views set to Access will show up as their own section further down the list for you to configure.
If you want to give a role access to every available view, use the Select All Perspectives checkbox rather than switching each one individually.
Global Features
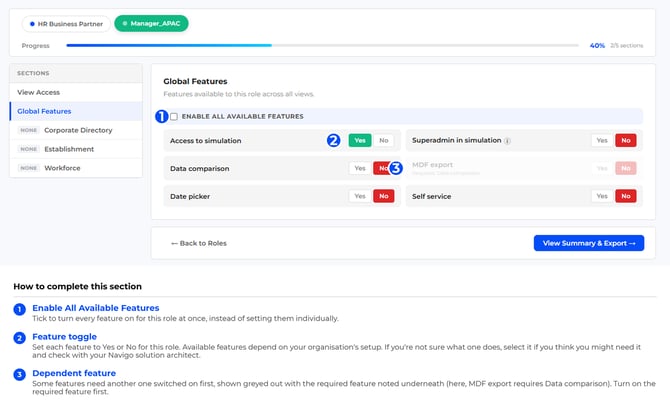
This section controls features that apply to the role across every view they can access, not tied to any single view. Depending on your organisation's setup, this might include things like the ability to run simulations, compare data, or export data in specific formats. Set each one to Yes or No.
Some features depend on another feature being switched on first (the dependent feature being greyed out until it can be selected).
If you're not sure what a particular feature does or whether it applies to your configuration, select it anyway if you think you might need it, and reach out to your Navigo solution architect to confirm.
If you want to turn every available feature on for the role, use the Enable All Available Features checkbox at the top instead of setting them individually.
Each view's access protection
For every view you gave this role Access to in the View Access section, you'll see a separate section further down the list, named after that view. This is where you decide exactly what the role can see within that view. You have three options:
None: no access protection. The role sees everything in this view.
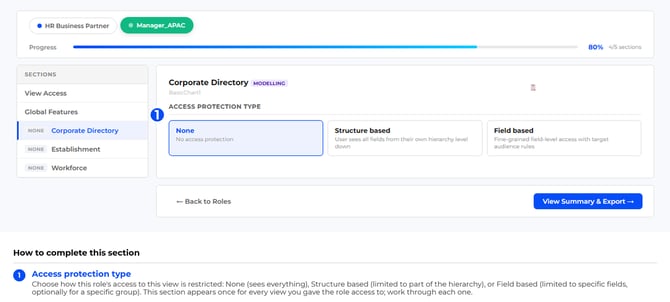
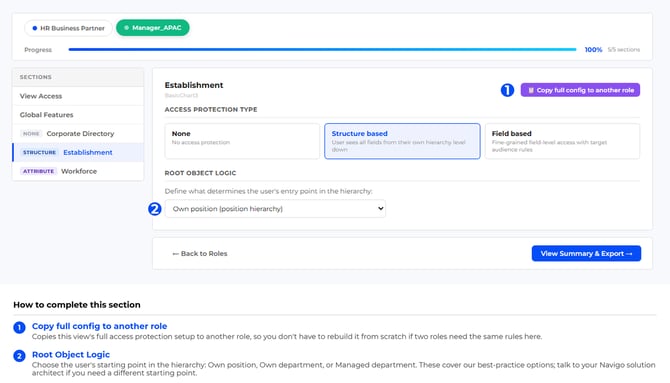
Structure based: the role only sees data for people or positions at or below a specific starting point in the hierarchy, not the whole organisation. When you choose this option, a Root Object Logic field appears, where you define that starting point. Your options are:
- Own position: starts from the user's own position in a position hierarchy
- Own department: starts from the department the user's position sits in, in a department hierarchy
- Managed department: starts from a department the user manages, in a department hierarchy
These three cover our best-practice options. If you have a different starting point in mind, talk to your Navigo solution architect.
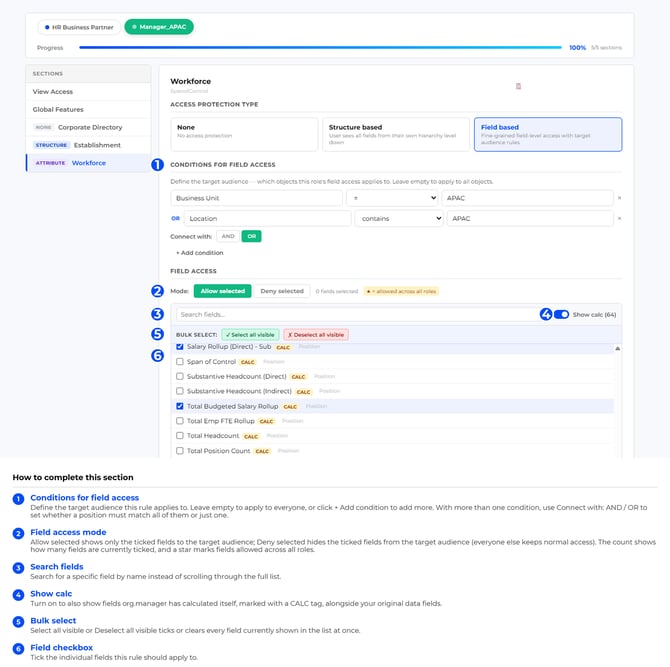
Field based: fine-grained control over exactly which fields the role can see, optionally limited to a specific group of people or positions. This is the most flexible option, and it works as follows:
First, under Conditions for field access, define the target audience (the group of people or positions this rule applies to). For example, you might set a condition of Business Unit equals a specific business unit name. Leave this empty if you want the rule to apply across the whole organisation, or click + Add condition to combine more than one condition. When you have more than one condition, use Connect with: AND / OR to choose whether a position must match every condition (AND) or just one of them (OR) to be included in the target audience.
Then, under Field access, choose a mode:
- Allow selected: the fields you tick below are the only ones visible to this role, and only for people/positions matching your target audience above. Anyone outside that target audience won't see those fields through this rule.
- Deny selected: the fields you tick below are hidden from this role for people/positions matching your target audience above. Anyone outside that target audience can still see those fields.
For example, if you want a role to see a set of fields only for one particular business unit and nowhere else, set the condition to that business unit and the mode to Allow selected. If instead you want a role to see those fields everywhere except one particular business unit, set the same condition but switch the mode to Deny selected.
Below that, tick the individual fields the rule should apply to. You can search for a field by name, and use Select all visible or Deselect all visible to quickly tick or clear everything currently shown in the list (for example, after searching or scrolling). 'Visible' in this case applies to all fields currently shown in the whole list (e.g. when you searched/filtered the list).
Turn on Show calc if you also want to see fields that org.manager has calculated, rather than only the raw data fields provided in your original data.
You may notice a star next to some fields: this marks fields that are allowed across all roles.
Work through every view listed for the current role, then switch to the next role tab and repeat the whole process (View Access, Global Features, and each view's access protection) until every role is fully configured.
Once you're done setting up all roles, scroll to the bottom of the screen and click 'View Summary and Export'.
Step 5: Review and submit
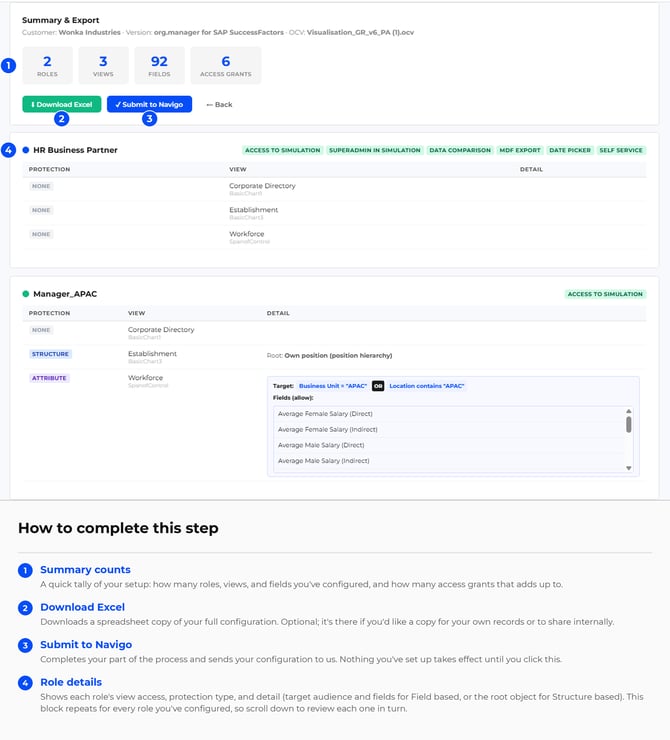
Once every role is configured, you'll land on the Summary & Export screen. This gives you a read-only overview of everything you've set up: every role, the views and protection types you've chosen for each, and the detail behind them (targets, allowed/denied fields, or the root object for structure-based views).
Use this screen to double-check your setup before submitting. Two buttons are available:
Submit to Navigo: this is the step that actually completes your part of the process and sends your configuration to us.
Download Excel: downloads a spreadsheet copy of your full configuration. This is optional; it's there if you'd like a copy for your own records or to share internally, but you don't need to send it to us separately.
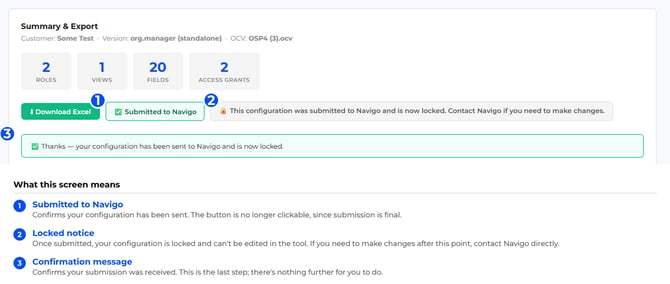
After submitting to Navigo, the configuration will be locked and we will apply this to your org.manager setup.
Frequently asked questions
What if I can't find the SuccessFactors permission role I need in Step 1?
The permission role needs to already exist in SuccessFactors before you enter its name here. If it doesn't exist yet, or the right group of people isn't assigned to it, that needs to be sorted out in SuccessFactors first. In the meantime, enter a placeholder name so you can continue with the rest of your setup, and let your Navigo solution architect know that the name will need to be updated later on.
Do all roles need the same sections configured in Configure Access?
No. Each role can be given access to a different set of views, different global features, and a different access protection type per view, and that's the point of having separate roles.
What's the difference between Structure based and Field based protection, and can I use both on the same view?
Structure based limits which part of the organisation a role can see, but shows all fields within that part. Field based limits which fields a role can see, optionally only for a specific group of people or positions; it doesn't restrict which part of the organisation they can see. You can only choose one access protection type per view for a role, so they can't be combined. Pick whichever one matches what you're trying to restrict.
What happens if I don't set a condition under Field based access?
The field access rule applies to everyone: the fields you've selected will be allowed (or denied) for the whole organisation, not just a subset of it.