-2.png?width=221&height=60&name=Navigo_Logo_High_Res%20(1)-2.png)
What this tool does
The Access Protection Configurator lets you control exactly what different groups of people can see when they use org.manager. Rather than giving everyone the same view of your organisation, you can set up separate configurations (for example, general staff, people managers, and HR administrators) and decide what each role can and can't access in org.manager, right down to individual fields like salary or performance ratings.
Navigo provides you with a link to the tool and has already done some of the setup (steps 1 and 2), based on your org.manager configuration before sending you this link, so you're picking up partway through.
There are three things you'll do: define your access roles, configure what each role can see, and then review and submit your setup.
Finding your way around
The toolbar at the top of the screen shows your progress and which step you're currently on, so you can always see how far through the setup you are.

If you need to come back to this article while you're working, click the question mark icon in the top right corner, it will bring you straight here.
You'll also notice small i icons next to some fields and buttons throughout the tool. Hover over one with your mouse and it will show you a short explanation of what that field or button does.
Steps 1 and 2: Done by Navigo
Before sending the link to the tool to you, Navigo has already completed these steps. Your link will open directly at Step 3.
Step 3: Define access roles
This is where you create the roles that will exist in your organisation's org.manager setup.
A role is simply a category of user (for example, General User, Manager, or HR Administrator). In the next step you'll decide what each role can see; in this step you're just naming the roles and telling us how to identify who belongs in each one.
For each role, you'll fill in two fields:
Role name: a short, clear name for the role (for example, "Manager" or "HR Admin").
Role description this is not a description of what the role can access. It's the rule that tells us how to identify which of your employees belong in this role. Use this field to describe the logic that must be met for a user to be part of this role. For example:
- "Users whose position has direct reports" (to identify managers)
- "Users in the People & Culture department"
- "Users where the field 'Is HR Admin' is flagged Yes"
- "Users whose Job Title contains 'Manager' "
This field is required for every role. We need it to know who to assign the role to. Be as specific as you can here, too: this description is what determines who actually gets each level of access, so if it's vague or inaccurate, the wrong people may end up with the wrong access.
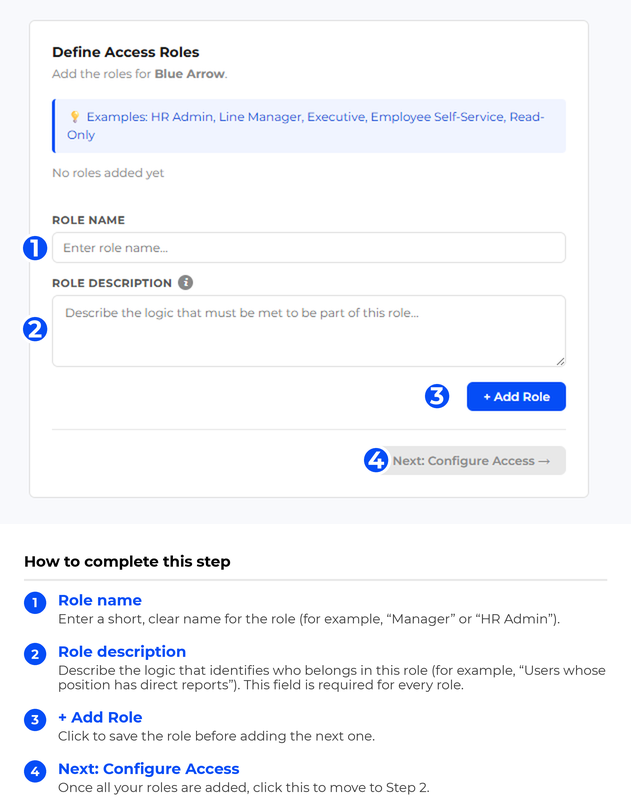
A common approach we recommend is three roles: a General User role that can't see any sensitive data, a Manager role that can see some sensitive data (for example, a separate manager dashboard showing their team), and an HR Admin role that can see everything. This is only a starting point, you can create as many roles as you need, structured however makes sense for your organisation.
Step 4: Configure access
This is where you decide what each role can actually see and do in org.manager.
You'll configure access separately for every role you created in Step 1. Use the role tabs near the top of the screen to switch between them, and make sure you go through every section listed for each role.
Views & Features will always be one of the sections. Alongside it, you may see one or more of Position, Employee, and Org Unit. Which of these appear depends on the data your organisation has provided, so you might only see one or two rather than all three. Whichever sections appear, work through each of them for every role.
Views & Features
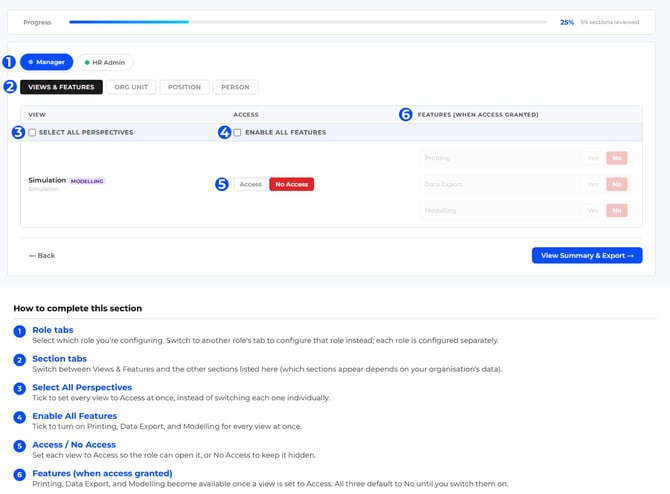
This section controls which chart views and features a role can open at all (for example, the standard Org Chart, an Establishment chart, a Diversity chart, or a Budget chart).
For each view, set the access switch to Access or No Access. A role only sees a view in org.manager if it's set to Access.
Once a view is set to Access, three extra options for that view become available:
- Printing: whether the role can print that view, or download it as a PDF or PowerPoint file
- Data Export: whether the role can export the data behind that view (for example, to Excel)
- Modelling: whether the role can access the modelling functionality within that view
Both default to No, so if you want a role to be able to print or export a view, you need to switch that on separately after granting Access.
If you want to give a role access to everything, or turn every feature on at once, use the Select All Perspectives and Enable All Features checkboxes at the top of the list rather than going through each view individually.
Position, Employee, and Org Unit
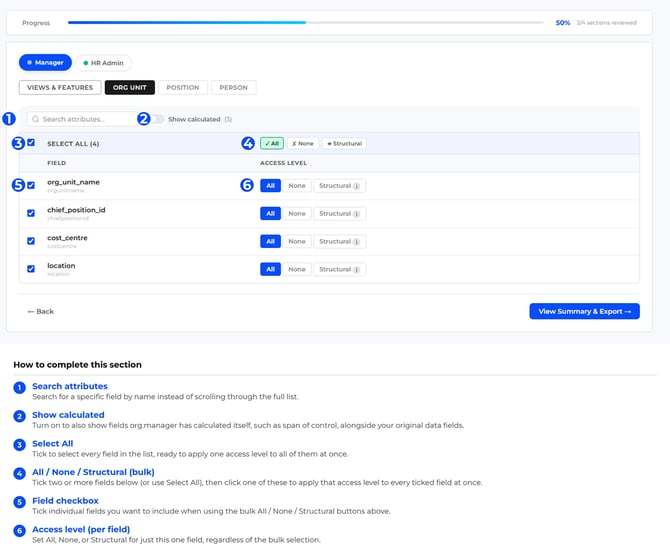
These three sections all work the same way, and each one controls access to a different category of data field (e.g. position-related fields, employee-related fields, and org unit-related fields respectively).
For every field, you choose one of three access levels:
- All: the role can see this field's data for every position/employee/org unit in the organisation
- None: the role can't see this field at all
- Structural: the role can see this field, but only for people or positions at or below their own position in the hierarchy, not the entire organisation. This is typically the right setting for a Manager-type role, so a manager can see certain data for their own team without seeing it for the whole company.
You can set fields individually, or tick the checkbox next to two or more fields (or use Select All) and then use the All / None / Structural buttons at the top of the list to apply one access level to all the fields you've ticked at once.
Each section also has a Show calculated toggle. Turned off, it only shows the data fields you originally provided to Navigo. Turned on, it also shows fields that org.manager itself has calculated (such as span of control). These follow the same access rules and are worth reviewing if you want tight control over exactly what's visible.
Work through all data types for the current role, then switch to the next role tab and repeat all sections until every role is configured.

Step 5: Review and submit
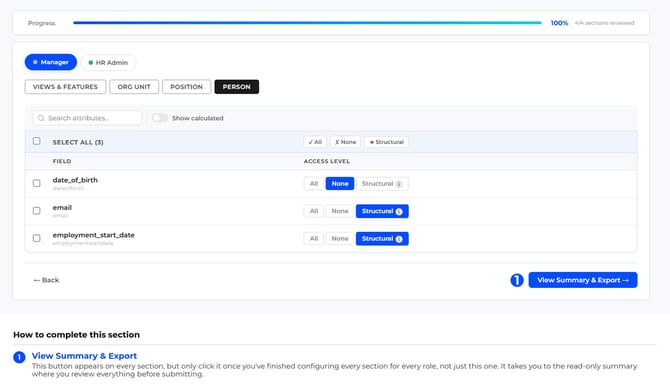
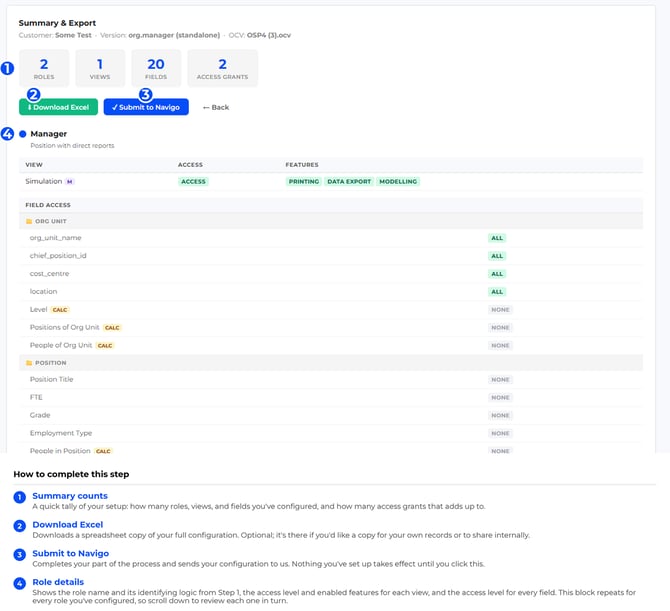
Once every role is configured, you'll land on the Summary & Export screen. This gives you a read-only overview of everything you've set up: every role, with its access rule, and the exact access level for every view and field.
Use this screen to double-check your setup before submitting. Two buttons are available:
Submit to Navigo: this is the step that actually completes your part of the process and sends your configuration to us.
Download Excel: downloads a spreadsheet copy of your full configuration. This is optional, it's there if you'd like a copy for your own records or to share internally, but you don't need to send it to us separately.
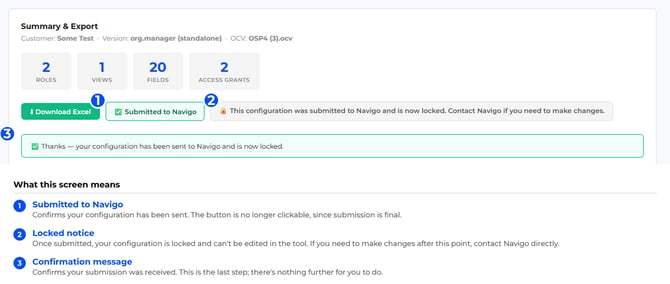
After submitting to Navigo, the configuration will be locked and we will apply this to your org.manager setup.
Frequently asked questions
Do I have to fill in every role the same way?
No. Each role can have completely different access. That's the point of setting up separate roles. A General User role and an HR Admin role would typically look very different across every section.
What happens if I don't set an access level for a field?
Fields default to No Access, so anything you don't actively set to All or Structural will stay hidden from that role.
Can I go back and change something after I've moved to the next role or section?
Yes, you can move between role tabs and sections freely before you submit. Once you click Submit to Navigo, get in touch with us if you need to make further changes.
What's the difference between "All" and "Structural" access on a field?
All gives the role visibility of that field for everyone in the organisation. Structural limits it to people or positions at or below the role's own position in the hierarchy (this is useful for giving managers visibility of their own team without exposing the whole organisation's data to them).